Monday, October 26, 2015

Back to the basics

With all the changes that have taken place in the last few weeks, I havent really kept up on the Blog.

As of today, the truck is running fine,  I had a slight issue with some oil pressure, which turned out otbe a faulty sending unit and after a new oil pump, some gaskets, and finnaly a mechanical oil pressure gauge, i was able to see that the engine is running fine, and makes good oil pressure and flow.  This goes to show, that just because the gauges are fancy doenst mean they always work.  This is somethign to say about a mechanical.


Once I figured out that fun stuff, I was finally able to make some progress on the Transfer case as well as the gauge cluster.

With the change over of the T Case to a mechanical, again back to the basics, i had to do some modifications to the floor.  After taking out the seat and moving back the carpet, i discovered what every person fears in an old truck, RUST!!!   The drivers side floor board had all kinds of rust in it, which could eventually lead to holes in the floor boards.  Thank goodness for small things in life, aka,changing things out for mechanical devices. Modifying the floor board to fit the new Transfer Case shifter was kind of a fun experience.  It helped me get the floor fixed as well as removed the old shifter and get the floor cleaned up.

 I wish I got more pictures of the whole process but then again when have I ever done that?


 So here it is.  It functions.  goes through all 4 modes, including 4 hi and 4 low.  I haven't hooked up the lights yet but then again who needs lights, when you can see the thing?

With that all done, I was able to move on to the funner things.  The dash and gauge cluster.

After doing a bunch of research online, i came across the idea of doing an Ipad Mini for the main gauge cluster.  I know this sounds  a bit hoakie, but its really cool.  With the truck having a motor from a newer vehicle and computer controlled, the OBDII port was all i need to help make this work.
So through some software, an iPad mini, and mount for the device, i was able to modify the surround from the original truck to fit the device into the dash, as well as add gauges that didn't have information through the OBDII port.  The original truck had 4 gauges to the left with two larger gauges in the middles for speedometer and fuel.  Removing the two larger one in the middle, i was able to replace them with the iPad mini then place a fuel , oil presser "still need new sender", volt meter, and a trans temp gauge.


Here's one picture of how it looks.  See how everything fits in there?  its really cool to see it in person, so for those of you who live near by, by all means come see it.
Its pretty clean, and was kind of fun to do. again all learning processes but they are fun no doubt.

As for other things, its good to make progress. So as I make more, Ill try and post more.


Thursday, October 1, 2015

Current Status

The Current State of the truck.


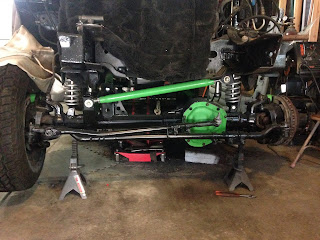
While it looks worse than some of the other pictures, its mostly due to the fact its sitting back on jack stands so i can complete they steering assembly this week.

You can see that the passenger side fender is on, and ready for the driver side.  Once i get the shifter linkage to the transmission completed.  


I have also finished the down pipe and exhaust out to the mufflers behind the cab.  Its still a little loud but it sounds really good.  Ill see if i can post an audio track or movie with it running sometime soon.

One thing I forgot to mention was the Transfer case.  * It being the main cause of all the fabrication and modifications to the truck.  The original Yukon transfer case is electronically controlled via the PCM, BCM, Front Axle and Anti Lock brake systems.  I was hoping that i could just use the electronics from the Yukon and make it work in the truck and have Push Button 4 Wheel drive.  It wasn't until I got to the electrical work that i discovered  all the other components needed to make it work.  OOPS!!!!  Lesson learn. :)  Since the transfer case wouldn't work i began researching other units that would,  I discovered that the T-case from a mid 90's GM truck or SUV would work perfectly, as long as i could find out with manual shift.  

Enter the JUNK yard.   It didn't take long to find what i was looking for.  In fact I think was there a total of 5 minutes before i found exactly what i needed.  A mid 90's Suburban with T Case, and Manual floor shifter, still intact and ready for picking.  It took about an hour or so to remove, but i was able to get everything I needed and only cost me about $200.00.  Pretty good price really considering a new one could have cost me $500+
I got the T case installed and now just have the shifter linkage left to install once I take out the interior so i can cut a hole in the floor. 

As it sits right now, I have the following left,

Linkages, Fenders, Hood, Grill, interior Gauge sets, which include Mini iPad for the dash cluster, that will be cool in of itself, and a few odds and  ends. One thing I know Ill have to do is take it to a Drive line shop to have some built rather than attempting to do it myself.  It'll be better this way,

Any ways, ill update as soon as i make some progress.  Ill try to remember to take better pictures too.

Electrical, Steering, Cooling, and All that Jazz

One thing a project like this needs is a good electrical system.  Since the Yukon's engine is managed by a computer and all the electrical is there in order to run the engine and transmission, I was able to pull the parts i needed such as the Electrical harness, and fuse block from the Yukon and install it into the 86'  This fit nicely on the drives side fender well along with the battery.


One thing i almost forgot was the ability to use stock fender wells with the new suspension set up with minor cutting.  So once the fenders are back on, you wont really be able to tell its a different suspension.   Kind of cool I think.


With the Fenders and radiator support in place, I began painstakingly trying to figure out how to get the electrical, plumbing, and linkages to fit and work as they should.  Even though there's quite a bit of room under the hood, there a lot of stuff that has to be tied together. 


I decided to fit the lights one the one side to see if they still worked and to help hold the harness in place.  Ill fix them soon enough. 

Among some of the things I had to wire for include: Fuel Pump (Bosch 044), Electric Cool fans, Gauges for Oil, Water, Electrical, etc, the OBDII port, sensors, Cruise Control, Brake controls and a few others. Its taken some time so don't think this is just a overnight project.  It take some time. 

One thing I would recommend doing is waiting to get the PCM flashed.  I waited till I was almost done with the Electrical to get the PCM flashed, I think they helped me keep from trying to start it with out everything being ready. Thus saving myself some heart ache and potentially skipping some all important steps.  I took my PCM to Premier Complete Auto Care in West Jordan, UT.  They did a great job and were convenient in that I didn't have to ship my PCM anywhere.

Steering:

This was challenging for sure.  Since I had placed a big ol' Coilover shock right in the way of the stock steering shaft, Enter Double-U  U-joints.  Something I had never seen before, but am grateful for.


On the left is the stock shaft,  From there it goes into a U joint, Then to a double U joint, followed by a support,  around the coilover, to another Double U joint, then through another support,  on the other side of the Coilover, then to a final U joint and into the steering box. 


Here is a better view of the final shaft bending around the coil-over. 
*Note:  I had to move the steering box forward roughly 2 inches to help clear the pan-hard bad mount for my steering to work.  I hope it still works. 


Not the easiest to see, but down in there is the tie into the steering box.

Cooling system:

I was able to use the Stock radiator from the 86' along with the coolant tank.  I did learn something about how these systems work.  In the original engine, the cooling system works by filling hte radiator and engine block at the same time when you fill up the radiator as the thermostat is on the top of the block.  With the LS based engines such as the 5.3, the thermostat is located on the low side of the block,  I filled the radiator and started the motor, hoping to see a drop in coolant level, i ran the motor a little and saw the temperature rise. This concerned me to the point I almost too the system apart as i thought i had a sticky thermostat.  NOT GOOD... 

After doing a parts run and trying again, I had epiphany that maybe i needed to try and pour coolant into the top of the motor via the coolant hose.  Upon doing so, which took almost a gallon itself, I hear a distinct click noise and soon coolant began flowing through the system and upon starting the engine,I could see it begin to cycle.  Much to my amazement, the cooling system works perfectly, even the electrical fans i installed work really well too.  Its an awesome feeling knowing that something you did is finally coming to life and getting close to the finish.


Front/ Rear Suspension

Once the old axle was out of the way, there were all sorts of ways to go,  Keep leaf springs, convert to coil overs,  triangulated 4 link, etc.  After stopping by Midnight4x4, www.Midnight4x4.com and talking with them, I concluded to begin doing a 3-Link setup with a Pan-hard bar from stability and Coilover shocks.  It wa A lof of work and took a lot of moving and fitment here at there.  Below ill walk you through the steps.

Placing the axle under the truck to begin placing mounts and Tubes

See the upper link.  I ended moving that a few times before it was correct.


A side view of the upper and lower mounts on the passenger side


Drivers side.  Notice how close it is to the differential.

 I had to wait about a month before my shocks showed up, Once they did though, I was Super excited to get the shock hoops installed and the links to begin flexing the suspension and make sure everything fit from full compression to full drop out. 


After reassembly multiple times, it was time for paint and final assembly.


See how well the shocks look  once everything is all prettied up.


Got the axle assembled with new brakes and coil springs


Close up of the axles, bump stops, coil-over springs and limit straps.
  Don't forget the limit straps and bump stops.
  They keep things from hitting or bottoming out.


Drivers side all ready to go.


Ooh Pretty.  But notice no Steering.  
That will come soon enough.

The Rear End:

 Though providing its own challenges. The Rear was much easier, thus not many pictures.
The Rear axle involved Removing the original axle perches and installing new one to accommodate the difference in frame widths between the 99' Super Duty and the 86' K10.  
About 2" different really.  

Everything turned out pretty well. 
Though I did have to get new U Bolts to fit the larger tube diameter.


Final assembly of the Front suspension with the truck sitting on all 4 wheels.  It has about a 4-6 inch lift with roughly 10-14" of travel.  Should make for one sweet ride.

I will say that this part was the most time consuming as well as the most rewarding.  I went through a lot of blogs and posts a well as visiting the 4x4 shop time after-time to get parts and advice on how to build things as well as figure out how to make it all fit. 

Things went pretty well, and I couldn't be happier. I've learned to to weld, assemble axles, how 3 and 4 link suspensions work, and countless other skills and information for the next time i decided to do something like this. 

 After this comes the more challenging part of  Electrical and Steering. Among other things. Stay Tuned...

Tear Down of the 86'

In March of this year, with plans decided, I began the dismantling of the 86', which was two fold really.  After being in Utah all of its life, the salt, water, and other corrosive things here, were getting to the body and aspects of the truck.  She needed some new metal.

 
Before Tear down.

 After I tore the front end and old engine out.  As you can see the fenders and such are in the background.

All clean, with some new paint. 
 I think its been painted and repainted a few times since this picture was taken.

New Pretty Green engine installed in the frame.

Looks good sitting in there don't it?

Close up.

This is where things started to change from the original swap plan, to the lets do some cool S-*! plan.
 I wanted to used the Yukon's transfer case, as it offered a more robust option for driver side drop and selection. *This later proved to be the key to everything that follows.
Only problem was that the truck originally came with passenger side prop from axles, with some small gears.   Deciding to go all in, i purchased a set of 99' Ford Super Duty Axles with 3:73 gears in them to change out beneath the truck.  these would provide both added strength, as well as the driver side drop axle I needed.
$900.00 including the wheels, later I had them in the shop ready to be fabricated into place.


First the old axle had to go.  Sitting on jack stands wasn't ideal, but I was sure to place them in correct places and make sure the bed was weighed down with some old parts from the truck for ballast.


2015 A New Year!

Finally after going all winter without  any progress on my ideas of which way i wanted to go with the truck, i was talking to a friend at church one day who is big into Jeeping, and off loading, and he's telling me all about his build on his jeep.  That's when it all came about....


I was going to do the engine and transmission swap into the 86' and use whatever else i could from the Yukon to make it better.  Out came the engine, transmission, transfer case, and all the wiring.  What a mess. There really is a lot of stuff crammed into the engine compartments of cars these days..

After getting everything out I wanted out, The Yukon went to the backyard to be set on blocks, yes i know its "redneck", but i still need parts from it before scraping it. That's when the engine, which ran fine, needed a little refresher and a little flair. Note: "I had never tore down or rebuilt a vehicle engine before. So hopefully it runs"

Tear down revealed some of the seals and gaskets were on there way out. Especially the head gaskets, 150,000+ miles will do that to them.  So with new gaskets, seals, and some head work, I put it all back together.  Typical of the 80's and other small block Gm motors is either Orange or Black paint since i knew from when my brother Trevor rebuilt the motor in the family 72' GMC growing up. He painted that motor orange, which turned out pretty cool, but wasn't for me and this build.

Wall La!!
Grabber Green!


Trust me it really is a cool color, especially once its in the truck.


1- Year AGO

So about a year ago, and a good summer of driving the 86' around,  I decided an engine swap  would be a great idea to improve power and fuel economy. Lets face it, 80's something technology was great for its time, but with emissions and government controls, there wasn't a whole lot of power of fuel economy in these trucks. So why not upgrade? they make Kits for it......

I found a totaled 01' GMC Yukon that had mostly body damage, but still had a good power train.  Negations again ensued with a tow company and we finally settled on a price.  So one rainy Saturday morning, I woke up and took a long, long drive to Green River Wyoming.  With it being a little tricky to find, I inspected the goods and paid the man. One thing that was cool,  I was actually able to drive it onto the trailer when I picked it up and Drive it into the garage for tear down at home. No need for winches, thank goodness.


In The garage:

There it sat, for nearly 3 months in pieces, I couldn't decide if i wanted to do a body swap or a drivetrain swap.  Both had their advantages and difficulties.  Doing the body swap would have meant lots of hard labor hours, trying to convince people to help me remove and reassemble pieces, building custom mounts, etc.  Though it would have been nice to have a new suspension, frame, and drive train underneath an old school truck, which was the idea to begin with.


The dash was all tore apart, I wish I 
had more pictures of the destruction, but I wasn't worried about it then,
so use  your imagination as you view this part.


Doing the drive train swap had its own challenges, to name a few, engine & transmission mounts, fuel systems, exhaust systems, and a few others.  Though having the truck stay as much original as possible was a huge benefit because I loved the look of it.

Still the questioned Loomed.....  "Which way to take it?"


The Beginnings

In the early stages of 2014, I decided to get rid of my "big Honking diesel" which I hardly ever drove, and move to a more conventional, easy to work on 80's era truck.  I found a great 86' GMC High Sierra K10 Step side on KSL for sale. I knew the transmission was in pretty poor shape, as the guy who sold it to me, told me it didn't work at all.  Little did he know I already had a line on a replacement.
After negotiations and testing the truck out, $750 later I was driving her home.  Well sort of.. She needed fuel, so a buddy of mine had to help me get her to the gas station after only 1/4 mile driving down the road.

A few weeks later, a rebuilt transmission, some new tires, and a safety inspection, I had my first running and driving, paid for vehicle.  Even have the Title to prove it. :)  Its a pretty great feeling if you know what I am talking about.